The Best Ways to Fix Faded Photos in 2026: A Friendly Comparison Guide
The Best Ways to Fix Faded Photos in 2026: A Friendly Comparison Guide
Have you ever stumbled upon an old shoebox in the attic, opened it up, and found a stack of your grandparents' wedding pictures? Or perhaps a picture of your own childhood birthday party, now yellowed, muted, and losing its spark? Time is a thief, and unfortunately, physical photographs often bear the brunt of its passage. But here is the good news: as we navigate through 2026, you no longer have to watch your cherished family history fade away. If you are wondering how to fix faded photos without spending weeks learning complicated software, you are in the perfect place.
In this comprehensive, friendly comparison guide, we are going to explore the various ways you can breathe new life into those nostalgic moments. We will compare traditional manual methods, expensive professional services, and the modern, effortless solutions available to us today. By the end of this article, you will know exactly how to turn a dull, faded piece of paper into a vibrant, emotional masterpiece.
Why Do Our Precious Photos Fade in the First Place?
Before we dive into the solutions, it helps to understand why our pictures lose their luster over the decades. Knowing the cause can also help you preserve your newly restored photos for future generations.
Here are the top reasons your photos might be fading:
- UV Light Exposure: Leaving framed photos in direct sunlight breaks down the chemical bonds in photographic paper, causing the colors to bleach and shift, usually leaving a washed-out yellow or reddish tint.
- Environmental Humidity: Too much moisture in the air can cause photos to stick together or develop mold, while too little humidity can make them brittle and prone to cracking.
- Acidic Storage Materials: Many old photo albums created in the 70s, 80s, and 90s used adhesive pages containing acids that slowly eat away at the photo over time.
- Natural Chemical Decay: Simply put, the dyes used in older photographic processing methods were not designed to last centuries. They naturally degrade as the years pass.
Now that we know why it happens, let's explore how to fix faded photos using the best methods available in 2026.
Comparing Top Methods to Fix Faded Photos
When it comes to photo restoration, you generally have three routes you can take. Let's compare them so you can choose the path that best fits your time, budget, and patience.
Method 1: The Traditional DIY Approach (Manual Editing)
For decades, the go-to method for restoring a photo was to use complex graphic design software.
How it works: You buy a high-quality scanner, carefully scan your fragile old photo into your computer, and open it in a professional editing program. From there, you use tools to adjust color balances, manually clone out dust and scratches, and adjust contrast curves to bring back the lost shadows and highlights.
Pros:
- You have absolute, pixel-by-pixel control over the final image.
- It can be a fun, rewarding hobby if you enjoy digital art.
Cons:
- Incredibly Time-Consuming: Restoring a single photo can take hours or even days.
- Steep Learning Curve: Professional software is notoriously difficult for beginners to learn.
- High Cost: Subscriptions for these software programs are expensive, not to mention the cost of a good scanner.
Method 2: Hiring a Professional Photo Restorer
If doing it yourself sounds overwhelming, the next logical step is to hire someone else to do it.
How it works: You take your faded pictures to a local camera shop or mail them to a specialized online service. A professional digital artist will then scan and manually repair the image for you.

Pros:
- Excellent, museum-quality results.
- Zero effort required on your part once you hand over the photos.
Cons:
- Extremely Expensive: Professionals charge for their time, and manual restoration can easily cost anywhere from $50 to $200 per photo.
- Long Wait Times: You might have to wait weeks to get your precious memories back.
- Risk of Loss: Mailing one-of-a-kind physical photos always carries a slight risk of them getting lost in transit.
Method 3: The 2026 Way – Effortless One-Click Restoration
Welcome to the easiest, most joyful way to fix faded photos. Instead of fiddling with complex tools or paying exorbitant fees, you can now use smart, user-friendly online tools designed for everyday people.
How it works: You simply snap a picture of your old photo with your smartphone or scan it, upload it to a modern restoration platform, and click a single button. Within seconds, the image is restored, color-corrected, and sharpened.
Pros:
- Instant Results: What used to take days now takes literal seconds.
- No Technical Skills Needed: If you can upload a photo to social media, you can use these tools.
- Highly Affordable: It costs a fraction of the price of hiring a professional.
Cons:
- You rely on the tool's built-in intelligence, meaning you have slightly less manual control over individual pixels (though for 99% of photos, the automated result is spectacular).
Spotlight: The Best One-Click Solution for 2026
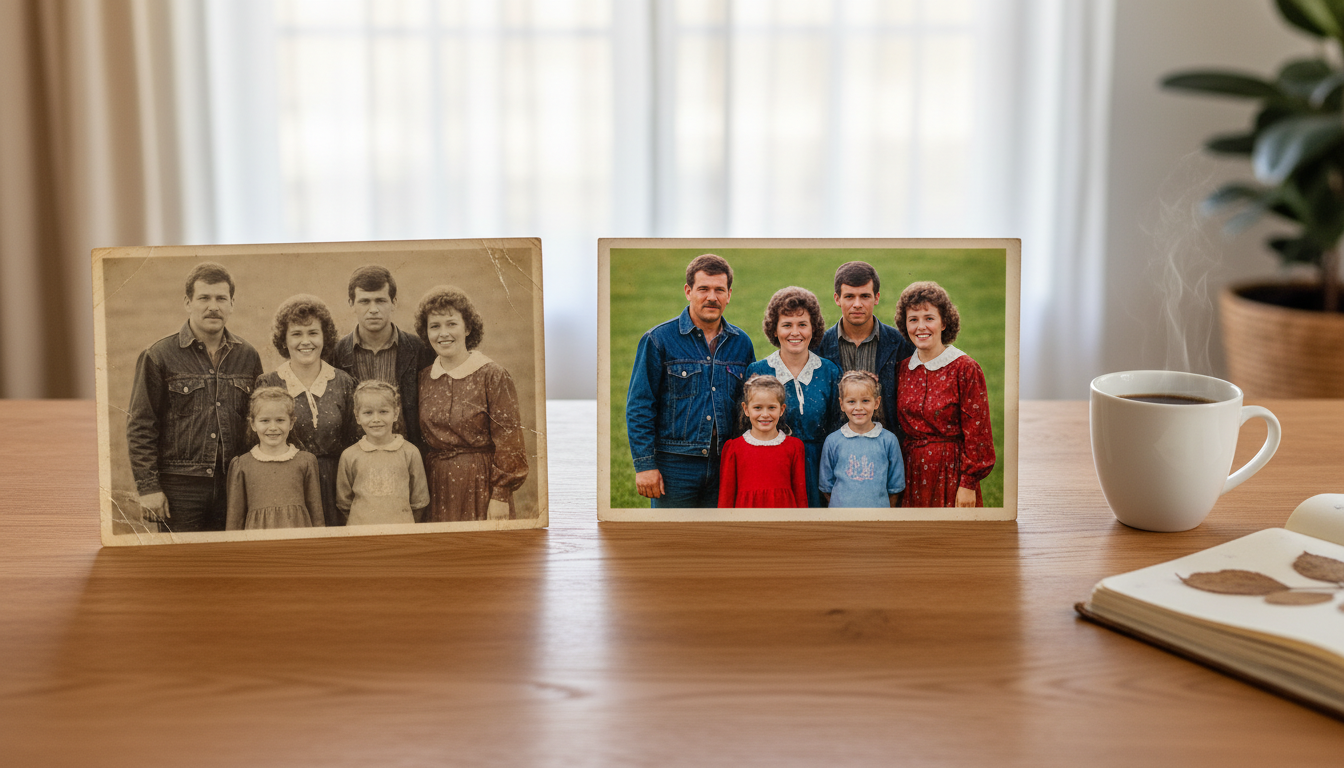
If you are looking for the absolute easiest and most effective way to restore your memories, we highly recommend checking out HaiMeta Restore created by HaiMeta.
This platform stands out in 2026 because it completely removes the headache from photo restoration. You do not need to understand color theory, contrast ratios, or healing brush tools. The core philosophy here is simple: upload an old, faded photograph, and with one single click, let the platform restore it to its former glory.
Why We Love It
- Friendly and Accessible: The interface is incredibly clean and welcoming. There are no overwhelming dashboards.
- Emotional Impact: Seeing a dull, yellowed photo of your parents suddenly pop with vibrant, natural colors is a genuinely moving experience. The tool focuses on bringing out the life in the image, not just applying harsh, unnatural filters.
- Speed: You can get through an entire family album in an afternoon, rather than spending a whole weekend on just one picture.
Step-by-Step: How to Fix Faded Photos with Ease
Ready to give it a try? Here is how simple the process is when you use a modern tool like HaiMeta Restore:
Step 1: Digitize Your Photo You don't need a fancy scanner. Just lay your faded photo flat on a table near a window with soft, natural light. Use your smartphone to take a clear, glare-free picture from directly above.
Step 2: Upload Navigate to the restoration tool and securely upload the image you just took.
Step 3: One-Click Magic Hit the restore button. You don't need to tweak any sliders or input any complicated data. Just wait a few moments.
Step 4: Save and Share Instantly download your beautifully restored image. You can now print it, frame it, or share it in your family group chat to spread the joy.

Real-Life Scenarios: Bringing Memories Back to the Surface
Why should you take the time to fix faded photos today? Here are a few beautiful ways people are using restored images in 2026:
- Anniversary Gifts: Imagine surprising your grandparents on their 50th wedding anniversary with a crisp, fully restored version of their favorite wedding portrait that had been fading on their mantelpiece for decades.
- Family Reunions: Creating a presentation or a new, modern photo book filled with pristine family history is the perfect conversation starter for your next big gathering.
- Genealogy Projects: If you are tracing your family tree, having clear, restored images of your ancestors adds a profound layer of connection to your research.
- Memorial Services: Celebrating the life of a loved one is much more impactful when you can display vibrant, clear photos of their happiest moments, rather than faded snapshots.
Tips for Preserving Your Newly Restored Photos
Once you have used HaiMeta Restore to bring your pictures back to life, you will want to make sure the physical copies are protected so they don't fade again.
- Print on Archival Paper: If you are printing your newly restored digital files, use acid-free archival paper and pigment-based inks.
- Use UV-Protected Glass: If you are framing the prints, spend a little extra on UV-blocking glass or acrylic to prevent sunlight damage.
- Store Originals Safely: Take the original faded photos and place them in acid-free, archival-quality sleeves. Store them in a cool, dry place like a closet shelf (avoid the basement or attic where temperature and humidity fluctuate wildly).
- Cloud Backup: Always keep multiple digital copies of your restored files in secure cloud storage. Physical items can be lost, but a well-backed-up digital file lasts forever.
Conclusion: Don't Let Your History Fade Away
Our photographs are more than just ink on paper; they are windows into our past, capturing the smiles, the fashion, the homes, and the love of the people who shaped who we are today. As we move forward into 2026, we are blessed with tools that make preserving this history an absolute breeze.
You no longer have to settle for the difficult, expensive, or time-consuming methods of the past. By choosing modern, user-friendly solutions, you can effortlessly fix faded photos and ensure your family's legacy remains bright and colorful for generations to come.
Are you ready to see the magic for yourself? Grab that old shoebox, pick your favorite faded memory, and visit HaiMeta Restore created by HaiMeta today. Experience the joy of one-click restoration and watch your cherished moments shine once again!